One of the basic and most-used WordPress skillz is to upload images and display them in your WordPress blog or site.
Here is how to do it:
The first thing to remember is that you don’t want to upload huge images straight from your camera. This is for several reasons:
- The camera gives you image a name that is just numbers and letters. You want to give a logical or descriptive name to your image
- If you upload a 4MB image to your blog and the viewer click on it it will take several minutes for it to pop up bigger, depending on the speed of the viewer’s internet connection. No-one likes to wait and watch the little ball spin.
- The camera might upload an image that is sideways
So show some love to your viewers and create a smaller version of your image by scaling it down, either in iPhoto or photoshop or Gimp, whatever is handy. I would say a good maximum size is about 1000 pixels, saved as a jpg in medium to high quality. Name that image something appropriate that is descriptive of the content, for example: my-dog-fluffy.jpg. In photoshop use the “save for web” option.
Now you can insert that image directly into your post or page. Assuming you are logged into your WordPress site, navigate to the page or post you would like to insert the image.

Click on the little Upload/Insert icon on the toolbar as shown above. The icons are for images, movies, audio sound files and media respectively. A window will pop up and give you a choice to select an image to upload from your computer. Click on Select Files and navigate to where your image lives.

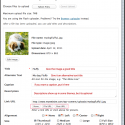
Select your image and click “Upload”. WordPress will upload the image and give you the option to name it and select from several choices of linking.
 To see how this looks, click on the thumbnail on the left. Notice how the thumbnail pops up a bigger picture. Thats because I linked the thumbnail to the File URL. You may choose to have no link or open the image up in a new window by choosing: Post URL. ( I never do that).
Always give your image a good title and an alternate title. The alternative title will show if a browser cannot see the image. Google likes alternative titles, so just do it.
You will see several choices of image sizes: thumbnail, medium or large. The exact size of these depends on the media settings you chosen when you set up your site. Many themes require specific image size settings. Choose a size.
You may align your image to the left or the right or center .
 When you have filled out all your options, click “Insert into post”. Then Click “Publish” to save your changes and You should see Fluffy. In your post.
If you are not happy with the way it looks, do not worry. You can change the alignment or the size of the image, or delete it from the post by clicking on it once and then clicking on the delete icon or the image icon. Deleting the image from the post will not delete it from the media library. So if you want to re-insert it, choose “from Media Library” next time. Have fun and play with the options. Thats the best way to learn.
