One of the best new features of the WordPress 3.0 upgrade was the support of custom menus. What does this mean for the user? It means that you can now create a menu that uses a completely custom made list of links, not only posts and pages, but also links to any other site you want. In addition you can put these menu items into any order you want and assign the links to any hierarchy. You might also choose to not show certain pages in the menu, for example the homepage.
Here is how you activate and create a custom menu.
First of all you must use a theme that has these custom menu feature enabled. Some themes that have been created before April of 2010 do not have custom menus installed.
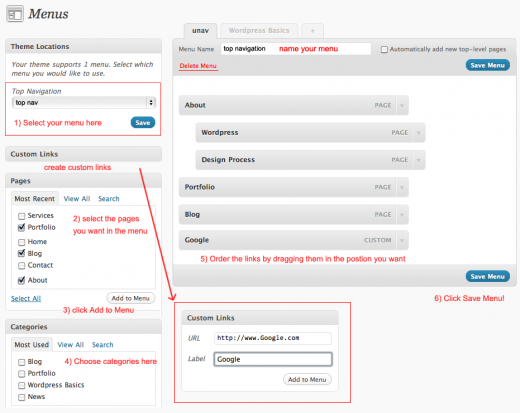
Now if you navigate to Appearance/Menus in your dashboard, you will see under “Theme Locations” that your theme supports one custom menu, named “Top Navigation”, which you can choose from the dropdown list.
Here is an illustration that will help you see what I am talking about. (Click it to make it bigger.) Save the menu and then start adding links to it by clicking the selection buttons and then the “Add to menu” button.
The selected links will now appear in random order in the window on the right. Save again. Then start dragging the links in the order you wish them to appear. Save the menu.
You will see that you can also drag the individual links to make them child-links fo other links. These will then appear as drop-downs if your theme has a drop-down menu.
To read more about installing these custom menus into your theme go to the WordPress Codex.

